![R4C Logo - Horizontal -Vec - Full Colour.svg]](https://service.rapid4cloud.com/hubfs/R4C%20Logo%20-%20Horizontal%20-Vec%20-%20Full%20Colour.svg)
To create a new Oracle User, be sure to get the Oracle Administration Account from your IT teams first and create a new user from that.
Articles:
- How to Create Oracle User
- How to Assign Roles
- Mandatory Oracle Setups
- Assign User
- Assign Procurement Business Unit to Oracle User
- Auto Approvals: Supplier
- Auto Approvals: Purchase Requisition
- Auto Approvals: Purchase Order
- Disable Invoice Approvals
- Disable Payment Approvals
- Assign Asset Book to User
- Assign Business Unit Data Access Set to User for Receivables Module
- Assign Data Access Set to User for GL Modules
- Optional Oracle Setups
HOW TO CREATE ORACLE USER
To create a new Oracle user, users will need to get access to the Oracle administration account from the IT department, to be able to log into Oracle and create a new user.
Credentials/Security:
Please refer to article RAPIDTest Installation Overview.
1) Log into Oracle with the administration account. 
2) Home page > Tools > Security Console
3) Users > Add User Account
4) Fill in the User Information > Save and Close
*Do not Log out of Oracle Administration account, please continue to documentation, How to Assign Roles.
HOW TO ASSIGN ROLES
Assigning roles to Oracle user is a very important step to allow access to tasks.
1) Home page > Tools > Security Console
2) User > Search for Oracle User > Click on Oracle User
3) Edit
3) Add Role
4) Search for roles listed in this documentation below > Add Role Membership > Done [after all roles are assigned]
5) Save and Close
6) Go to Setup and Maintenance
7) Run User and Roles Synchronization Process
8) Submit > Copy the process number > OK
9) Home page > Tools > Scheduled Processes
10) Search process number from step 8 > Refresh the results until the status Succeeded
Roles For RAPIDTest:
- Cash Management Role
|
Name |
Code |
|
Cash Manager |
ORA_CE_CASH_MANAGER_JOB |
|
Accounts Payable Manager |
ORA_AP_ACCOUNTS_PAYABLE_MANAGER_JOB |
|
Accounts Payable Payment Supervisor |
ORA_AP_ACCOUNTS_PAYABLE_PAYMENT_SUPERVISOR_JOB |
|
Accounts Payable Invoice Supervisor |
ORA_AP_ACCOUNTS_PAYABLE_INVOICE_SUPERVISOR_JOB |
|
Accounts Receivable Manager |
ORA_AR_ACCOUNTS_RECEIVABLE_MANAGER_JOB |
|
Accounts Receivable Specialist |
ORA_AR_ACCOUNTS_RECEIVABLE_SPECIALIST_JOB |
|
Supplier Manager |
ORA_POZ_SUPPLIER_MANAGER_ABSTRACT |
- Fixed Assets Roles
|
Name |
Code |
|
Asset Accountant |
ORA_FA_ASSET_ACCOUNTANT_JOB |
|
Asset Accounting Manager |
ORA_FA_ASSET_ACCOUNTING_MANAGER_JOB |
- General Ledger Roles
|
Name |
Code |
|
General Accountant |
ORA_GL_GENERAL_ACCOUNTANT_JOB |
- Payables Roles
|
Name |
Code |
|
Accounts Payable Manager |
ORA_AP_ACCOUNTS_PAYABLE_MANAGER_JOB |
|
Accounts Payable Payment Supervisor |
ORA_AP_ACCOUNTS_PAYABLE_PAYMENT_SUPERVISOR_JOB |
|
Accounts Payable Invoice Supervisor |
ORA_AP_ACCOUNTS_PAYABLE_INVOICE_SUPERVISOR_JOB |
|
Supplier Manager |
ORA_POZ_SUPPLIER_MANAGER_ABSTRACT |
- Payments Roles
|
Name |
Code |
|
Accounts Payable Manager |
ORA_AP_ACCOUNTS_PAYABLE_MANAGER_JOB |
|
Accounts Payable Payment Supervisor |
ORA_AP_ACCOUNTS_PAYABLE_PAYMENT_SUPERVISOR_JOB |
|
Accounts Payable Invoice Supervisor |
ORA_AP_ACCOUNTS_PAYABLE_INVOICE_SUPERVISOR_JOB |
|
Supplier Manager |
ORA_POZ_SUPPLIER_MANAGER_ABSTRACT |
- Procurement Roles
|
Name |
Code |
|
Procurement Requester |
ORA_POR_PROCUREMENT_REQUESTER_ABSTRACT |
|
Procurement Application Administrator |
ORA_PO_PROCUREMENT_APPLICATION_ADMIN_JOB |
|
Procurement Preparer |
ORA_POR_PROCUREMENT_PREPARER_ABSTRACT |
|
Procurement Manager |
ORA_PO_PROCUREMENT_MANAGER_JOB |
|
Supplier Manager |
ORA_POZ_SUPPLIER_MANAGER_ABSTRACT |
|
Receiving Agent |
ORA_RCV_RECEIVING_AGENT_JOB |
|
Advanced Procurement Requester |
ORA_POR_ADVANCED_PROCUREMENT_REQUESTER_ABSTRACT |
- Receivables Roles
|
Name |
Code |
|
Cash Manager |
ORA_CE_CASH_MANAGER_JOB |
|
Accounts Receivable Manager |
ORA_AR_ACCOUNTS_RECEIVABLE_MANAGER_JOB |
|
Accounts Receivable Specialist |
ORA_AR_ACCOUNTS_RECEIVABLE_SPECIALIST_JOB |
|
Collections Agent |
ORA_IEX_COLLECTIONS_AGENT_JOB |
*Do not log out of admin account, continue to Mandatory Oracle Setups.
MANDATORY ORACLE SETUPS
CM = Cash Management FA = Fixed Assets GL = General Ledger AP = Payables
PYMT = Payments PO = Procurement AR = Receivables
ASSIGN USER
- Task name : Manage Users
1) Go to Setup and Maintenance
2) Task > Search
3) Search for task Manage Users
4) Create user > Fill in the data in the fields highlighted in the image below > Save and Close

ASSIGN PROCUREMENT BUSINESS UNIT TO USER
- Task name : Manage Procurement Agents
1) Go to Setup and Maintenance
2) Task > Search
3) Search for task Manage Procurement Agents
4) Create 
5) Fill values into fields highlighted in the image below > Access to Other Agents' Documents = Full > Save and Close
*User must assign "Business Unit" based on the data that user provide in the module template.

AUTO APPROVALS: SUPPLIER
Tasks name:
- Manage Supplier Registration Approvals
- Manage Internal Supplier Registration Approvals
- Manage Supplier Profile Change Approvals
- Manage Internal Supplier Profile Change Approvals
- Manage Supplier Spend Authorization Approvals
Enable rules below for all tasks listed above:
- Stage: First Stage Approvals
- Participant: Parallel Approval First Responder Wins
Disable the rest of the other rules. Do this for all tasks.
*The processes to allow for auto approval will be the same for all tasks.
*To manual approve: reverse the steps and remove or disable any rule(s) that was created or enabled during these processes.
1) Go to Setup and Maintenance
2) Task > Search
3) Search for task name:
- Manage Supplier Registration Approvals
- Manage Internal Supplier Registration Approvals
- Manage Supplier Profile Change Approvals
- Manage Internal Supplier Profile Change Approvals
- Manage Supplier Spend Authorization Approvals

4) Search for stage, First Stage Approvals with participant, Parallel Approval First Responder Wins > Enable > Edit Rules
Disable all other rules.

5) Disable all rules that is not name “Auto Approve” > Create > Fill in values as shown in image below > OK 
6) Select row, Auto Approve > Add Action > Fill in values as shown in image below > OK

7) Save > Deploy > Save and Close
AUTO APPROVALS: PURCHASE REQUISITIONS
- Task name : Manage Requisition Approvals
Enable rule :
- Stage: Header Preapproval Stage
- Participant: Preapproval Header First Responder Wins

Disable all other rules.
*To manual approve: reverse the steps and remove or disable any rule(s) that was created or enable during these processes.
1) Go to Setup and Maintenance
2) Task > Search
3) Search for task Manage Requisition Approvals
4) Search for stage, Header Preapproval Stage with participant, Preapproval Header First Responder Wins > Enable > Edit Rules
5) Disable all rules that is not name Auto Approval > Create > Fill in values as shown in image below > OK
6) Select Auto Approve row > Add Action > Fill in values as shown in image below > OK

7) Save > Deploy > Save and Close
AUTO APPROVALS: PURCHASE ORDER
- Task name : Manage Purchasing Document Approvals
Enable rule :
- Stage: Terms
- Participant: Terms Approval First Responder Wins
Disable all other rules.
*To manual approve: reverse the steps and remove or disable any rule(s) that was created or enable during these processes.
1) Go to Setup and Maintenance
2) Task > Search
3) Search for task Manage Purchasing Document Approvals
4) Search for stage, Terms with participant, Terms Approval First Responder Wins > Enable > Edit Rules
5) Disable all rule(s) that is not name Auto Approve > Create > Fill in values as shown in image below > OK
6) Select Auto Approve row > Add Action > Fill in values as shown in image below > OK

7) Save > Deploy > Save and Close
DISABLE INVOICE APPROVAL
- Task name : Manage Invoice Option
*Business unit “US1 Business Unit” will be used as an example for this documentation process. User should use the data that the user prepared in the module template.
1) Go to Setup and Maintenance
2) Setup: Financial > Search task name, Mange Invoice Options > Scope > Select Business Unit > Apply and Go to Task
3) Uncheck “Enable Invoice Approval” 4) Save and Close
DISABLE PAYMENT APPROVAL
- Task name : Manage Disbursement System Options
1) Go to Setup and Maintenance
3) Task > Search
4) Search for task name, Manage Disbursement System Options
5) Uncheck Enable Payment Approval > Save and Close
ASSIGN ASSET BOOK DATA ACCESS TO USER FOR FA MODULE
- Task name : Manage Asset Book Data Access for Users
1) Go to Setup and Maintenance
2) Task > Search
3) Search for task name, Manage Asset Book Data Access for Users
4) Select option, User with Data Access > Create
5) Create > Fill in value as shown below for roles: Asset Accounting Manager and Asset Accountant > Save and Close
*Note, “Security Context Values” must be the same Asset Book data that user provides in the Fixed Assets module template.

ASSIGN BUSINESS UNIT DATA ACCESS TO USER FOR AR MODULE
- Task name : Manage Business unit Data Access for Users
1) Go to Setup and Maintenance
2) Task > Search
3) Search for task name, Manage Business Unit Data Access for Users
4) Select option, User with Data Access > Create
5) Create > Fill in values as shown below for role: Collections Agent > Save and Close
*Note, “Security Context Values” must be the same business unit data that user provided in the Receivables module template.

ASSIGN DATA ACCESS SET TO USER FOR GL MODULE
- Task name : Manage Data Access Set Data Access for Users
1) Go to Setup and Maintenance
2) Task > Search
3) Search for task name, Manage Data Access Set Data Access for Users
4) Select option, User with Data Access > Create 
5) Create > Fill in values as shown below for role: General Ledger > Save and Close
*Notes:
- User need to assign two data access set, one for Primary Ledger and another for Secondary Ledger.
- The “Security Context Values” must be the same Data Access value that user provided in the General Ledger module template.

OPTIONAL ORACLE SETUPS
Optional setups are required for certain scenarios to run successfully. However, if user does not require to run those scenarios, then on the scenario worksheet within the module template, change the scenario Enable to "NO".
*Scenarios that required these setups are listed in the table below, with “S” standing for scenarios. Such as, S1 is equal to scenario 1.
|
Setups |
Modules/Scenarios |
||||||
|
CM |
FA |
GL |
AP |
PYMT |
PO |
AR |
|
|
|
|
|
|
|
S11 |
|
|
|
|
|
|
|
|
|
S9 |
|
|
S4 |
|
|
S41 |
S12, 16, 17, |
|
|
|
|
S4 |
|
|
All |
S1-14, 16 & 17 |
All |
|
|
|
Edit Payment Process Profile Detail for Separate Remittance Advice |
|
|
|
|
S14 |
|
|
|
|
|
|
|
|
S2, 3, 6, & 7 |
|
|
CM = Cash Management FA = Fixed Assets GL = General Ledger AP = Payables
PYMT = Payments PO = Procurement AR = Receivables
ALLOW: OVER RECEIPT FOR MODULE PROCUREMENT
Required for module Procurement, scenario 11, Create Overbill Receipt. This setup will allow RAPIDTest to create overbill receipt successfully without getting error below.
- Task name : Manage Inventory Organization Data Access for User
1) Go to Setup and Maintenance
2) Task > Search 
3) Search for task name, Manage Inventory Organization Data Access for User 4) Select option, User with Data Access > Create
5) Create > Fill in value as shown below for roles: Receiving Agent > Save and Close
*Note, to know which inventory organization to assign, user can go to Procurement > Purchase Order > Task : Create Order and try manual creating with the data that user provide in the module template > Tab: Lines 

- Task name : Manage Receiving Parameters
6) Go to Setup and Maintenance
7) Task > Search
8) Search for task name, Manage Receiving Parameters
9) Input the Organization > OK
*Organization name “Seattle” will be used as an example for this documentation.

10) Change Overreceipt Action to None > Save and Close
CREATE "VOID" TRANSACTION TYPE FOR RECEIVABLES
Required for module Receivables, scenario 9, Create Void Transaction. This setup will allow RAPIDTest to create a void transaction successfully without getting error below.
- Task name : Manage Transaction Types
1) Go to Setup and Maintenance
2) Task > Search 3) Search for task name, Manage Transaction Types
4) Create
5) Fill in values to highlighted field as shown in the image below > Save and Close
User should key in the Transaction Type Set value based on the data that user wants to test. However, everything else should be same as the values shown in the image below.

DISABLE PAYMENT "RECOMMENDED DISCOUNT"
RAPIDTest does not support “recommended discount” popup, please double check this setup before running the test, otherwise, any scenarios that have created payment process will fail.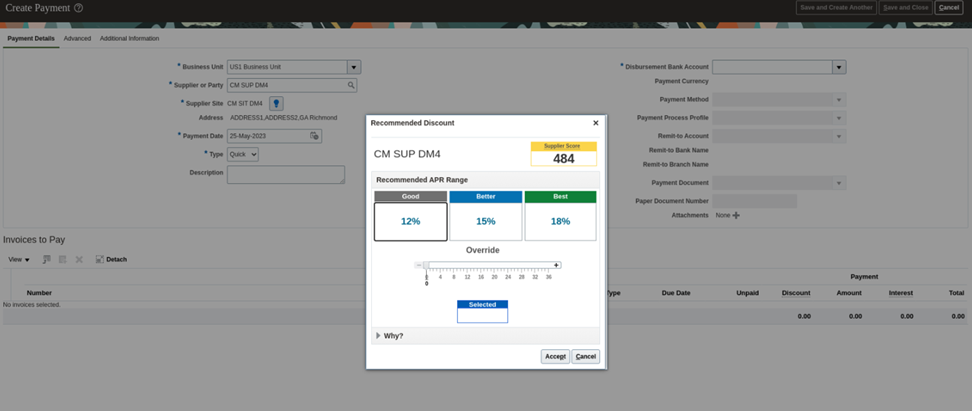
1) Go to Setup and Maintenance
2) Setup: Financials > Change Feature Opt In
3) Under Supplier Invoice Processing > Payables > Features
4) Early Payment Offers > Edit
5) Uncheck options: Standing Offers and Dynamic Offers > Save and Close
DISABLE SUPPLIER DATA SUGGESTION BOX
RAPIDTest, do not support case with data recommendation for supplier as we create new supplier for every scenario with the Supplier process. Please be sure to double check this setup to prevent fail tests.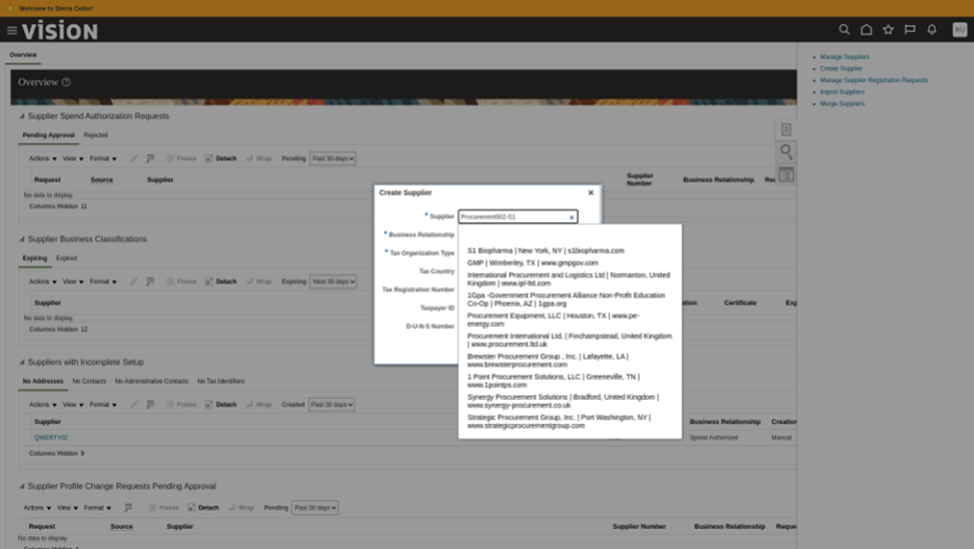
- Task name : Configure Supplier Integration with DataFox
1) Go to Setup and Maintenance
2) Task > Search
3) Search for task name, Configure Supplier Integration with DataFox
5) Change to an invalid URL, such as https://www.abcd.com > Save and Close
EDIT PAYMENT PROCESS PROFILE DETAIL FOR SEPARATE REMITTANCE ADVICE
Required for module Payment, scenario 14, Run "Send Separate Remittance Advice" for Payment Process Request. This setup will allow Oracle to automatically generate a separate remittance advice report, else, Oracle won't be able to locate the payment. 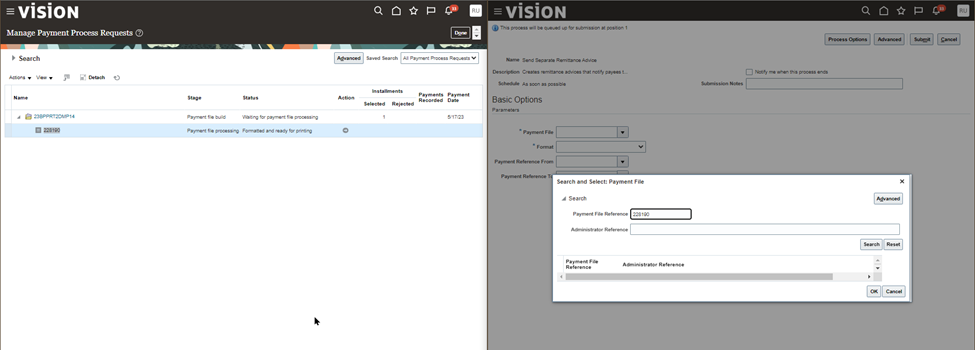
Payment process profiles, “External Check”, will be used as an example. User should setup for the Payment Process Profile that user provide in the module template.
- Task name : Manage Payment Process Profile
1) Go to Setup and Maintenance
2) Task > Search
3) Search for task name, Manage Payment Process Profiles
4) Search for Payment Process Profiles > Select row result > Edit
5) Tab Reporting > Format: Separate Remittance Advice Format > Save and Close
UNABLE TO CREATE NONCATALOG REQUEST
Must assign data to Deliver-to Location to be able to access task Create Noncatalog request.
*No specific task for this setup. Please follow the processes provided in this documentation.
1) Oracle Home page > Procurement > Purchase Requisition
2) More Task > Update Requisition Preferences
3) Check that Requisitioning BU value is the same as Business Unit that user provide in the module template > Requester should be the Oracle user name > Input any value for Deliver-to Location > Save and Close